
I’m a real fan of both analog and digital sketchnoting but recently, I’ve found myself doing sketchnotes on the iPad more. So here are some iPad sketchnoting tips that can help you improve your digital sketchnotes.
Many of these will work for other tablets.
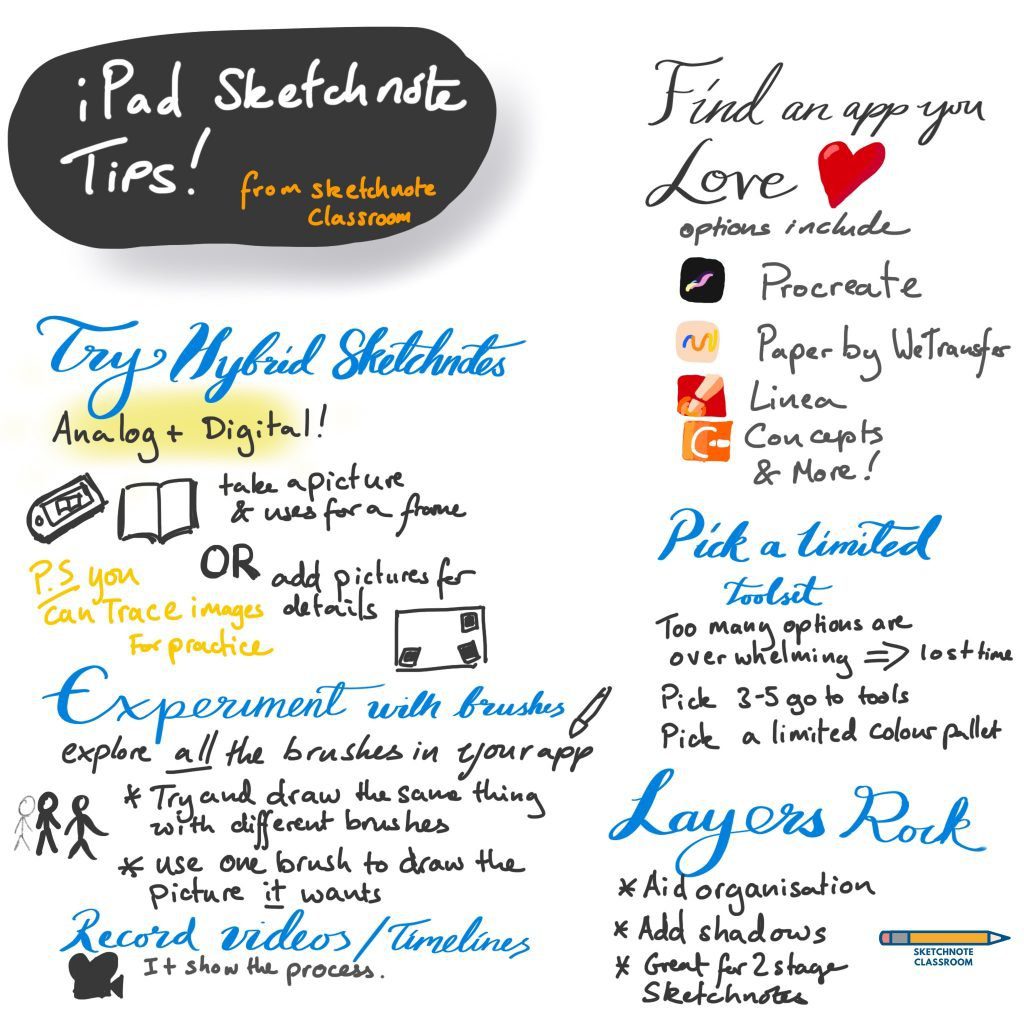
1. Find an app that works for you
There are loads of different iPad drawing and note taking apps with their own strengths and weaknesses. In general, you can think of two different axis’s that are usually related. You get simpler apps and more complex apps. And you can get apps that are more for drawing anda more for note taking. Someone may want a simpler app so they can focus on taking notes, while another person may want a more complicated one. Someone may tend to write rather than draw, or draw than write. Depend on your style you may want a different app. Of course, you can choose certain apps for different occasions.
My personal preference is to use Procreate for important sketchnotes and occasional Paper by wetransfer or Linea for simpler and rough sketchnotes. I also use Concepts for sketching vector images which are required for certain animation programs. Concepts has the added benefits of being on both Android and Windows.
2. Pick a limited toolset
Too many options can be paralysing. The more options you have, the harder it is to pick. These drawing and sketching apps often have more pens, brushes and colours than you could ever carry with you. That’s great as you have an amazing toolset in your hands at all time’s, but can make it difficult to make decisions while sketchnoting live.
When you pick a limited tool set — 2 to 5 pens, a few colours — you can reduce decision fatigue. Of course, you could always use a limited set of tools when sketchnoting live and then use more tools later. And the next top can help.
3. Layers can be really useful
Layers are a real power feature. they basically operate as having two separate see through pieces of paper that you can draw on and edit. This means you can draw on top of a different image, but leave it unchanged. You can also move one layer but not another. You can erase one layer but not the underlying layer. When sketchnoting, layers are great for
- making a rough first version, and a polished version on top
- adding shadow under an image later
- moving items around for better organization later.
4. Try hybrid analog/digital sketchnotes
You don’t have to stick to JUST using Digital or Analog. You can make a hybrid sketchnote where you take pictures of real objects and add sketches in between or on top of them. This can be a really handy way of either adding in a picture to a sketchnote for something to stand out, or creating a real background with a sketchnote on top that you can move around and adapt to find the limits you created.
5. Experiment with different pens and brushes and how they want to be used
Many apps have some unusual brushes and pens that react differently to pressure or create specific looks. It can be intimidating trying to work out how to use them but when you know how to use them, you can get some great effects. It’s worth spending some time just going through every brush and trying to draw the same object with each one, and then make a picture JUST using one brush. By combining both approaches you see how they differ and what they can offer.
6. Trace images for practice
If you aren’t confident at drawing, you can import images and trace over them. This is really great for adding a portrait of a speaker (faces are hard) where you trace the key details and then remove the underlying image.
7. Record a video or time lapse of creating your sketchnote
Procreate has a built in feature that records a time lapse in the background. on iOS (and I believe some android devices) you can record your screen as you make your sketchnote too. You can use the video you record to share the process of creating your sketchnots. I love sharing both the final result and the time lapse on instagram so you can see a bit of how I approach sketchnote and create certain effects.
What are your iPad sketchnoting tips?
Do you use an iPad to sketchnote? Have you got any extra tips that are missing? Leave them in the comments.
Leave a Reply